
Notifications in Megaladata using the Telegram chatbot
In the implementation of projects, there is often a need for a notification mechanism about one event or another. For example, about the completion of data loading into storage or the occurrence of deviations during the execution of a certain process. Having received a notification, the analyst can take the received information into account for further work. One way to implement the notification mechanism in the Megaladata platform is to send messages using the Telegram chat-bot.
In this demo example, the algorithm for working with the Telegram chat-bot is described: creating a bot, creating a group in Telegram, and appointing the bot as the group administrator. The mechanism for working with notifications is demonstrated on the example of a scenario: importing data, processing them, and exporting data to Excel.
Note: The demo example has a limitation in demonstrating all capabilities when running on the demo stand (Launch Demo). We recommend installing the example locally.
Initial preparation
- In Telegram, you need to find BotFather and get a description of the available commands.
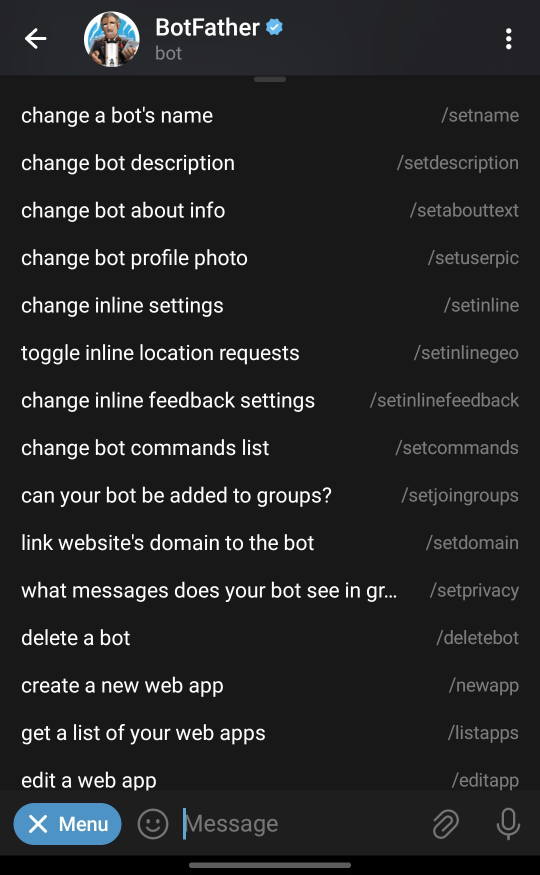
- Choose the /newbot command and set a name for the new bot and a unique username, which must necessarily end with "_bot"
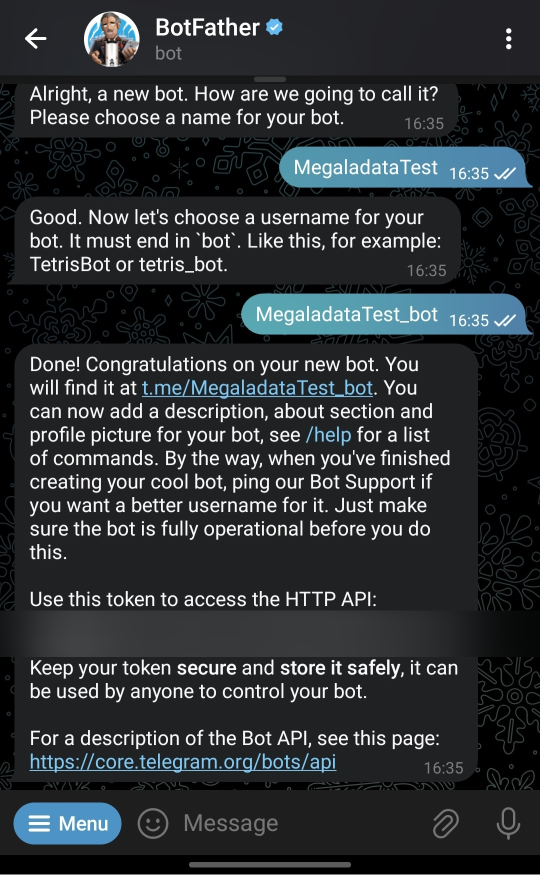
- It's important to save the token mentioned in the message.
Attention: It's crucial to maintain the confidentiality of the token. Publishing it allows anyone access to the bot's data, as well as the ability to send and read messages.
-
After creating the chatbot, it's important to create a group, add the bot to it, and include the users who need to receive notifications.
-
The bot should be granted the role of a group administrator.
-
Next, you should send any message to this group, for example, 'Hello bot', and type the following line in the browser:
https://api.telegram.org/botTOKEN/getUpdates
- In result, an answer will be received:
{"ok":true,"result":[{"update_id":4*******5, "message":{"message_id":*,"from":{"id":2********0,... ... ...},"chat":{"id":-6*******6,"title": ... ... ... "all_members_are_administrators":true},"date":1********1,"text":"hello bot"}}]}
In the response, the code -6*******6 is of interest — this is the identifier of the group where notifications will be sent. It needs to be saved for subsequent use in scenarios.
Algorithm Description
1. Import data
Table "Classification of Clients"
| Name | Caption |
|---|---|
| Class | |
| IDClient | |
| Quarter |
2. Data processing
In this step, the analyst can implement their own version of data processing. In the demo example, a data slice is selected for a specified interval using the Filter rows node.
The settings for the "Filter by quarters" node are as follows:
- Field — Quarter
- Condition — within the range
- Lower limit — 01.01.2016, 00:00
- Upper limit — 01.10.2016, 00:00
3. Uploading the result
The filtered data is exported to an "Excel file".
Upon completion of the export, the Telegram-bot will send a notification.
4. Notification via Telegram-bot
To use the bot, you need to obtain a token and group identifier as demonstrated above, and also formulate the notification text. The Telegram-bot submodel takes 3 variables as input: token, chat_id, and message_text.
The input port for variables in the Telegram-bot submodel::
| Name | Caption | Value |
|---|---|---|
| token | 5********5:A*********************************M | |
| Chat id | -6*******6 | |
| Message text | The upload was successful |
The working algorithm of the Telegram-bot submodel node:
-
Using the Calculator (variables) node, two variables are formed: an address in the form of a URL service and text with a chat identifier — Text in chat.
-
The URL service is input to the REST service, where the settings indicate a connection through a variable.
-
The Variables to Table node takes the Text in chat as input, and the into columns option is chosen.
-
The REST request handler receives the configured connection in the REST service and the result of processing Variables to Table.
-
Using the REST request setup wizard, the Text in chat field is linked to the request/ field.
By default, nodes in Megaladata can run in parallel. If you don't explicitly specify the execution sequence, sending a message to the chat will be done regardless of whether the Excel upload is completed or not.
To set the execution order for the Result Export and Telegram-bot nodes, you need to use the Execution Order Port. As a result, the request will only be sent if the file upload is completed.
Upon successful completion of the scenario, a message from the bot "Upload was successful" will appear in the chat, or whatever message is entered into the message_text variable.
It's important to consider the following:
-
The request to the chat-bot will be sent from the computer where the scenario is executed, i.e. either from the workstation where Megaladata Desktop is installed or from the Megaladata Server. It is necessary that the corresponding ports are open on this machine and there are no other restrictions on sending REST requests.
-
Chat-bot operations have limitations, such as no more than one message per second and no more than 20 messages per minute to the same group. You can read more about the restrictions in the Bots FAQ.
Download and open the file in Megaladata. If necessary, you can install the free Megaladata Community Edition.